The Quick Add page includes a sidebar that allows you to jump to other pages of the program using icons.
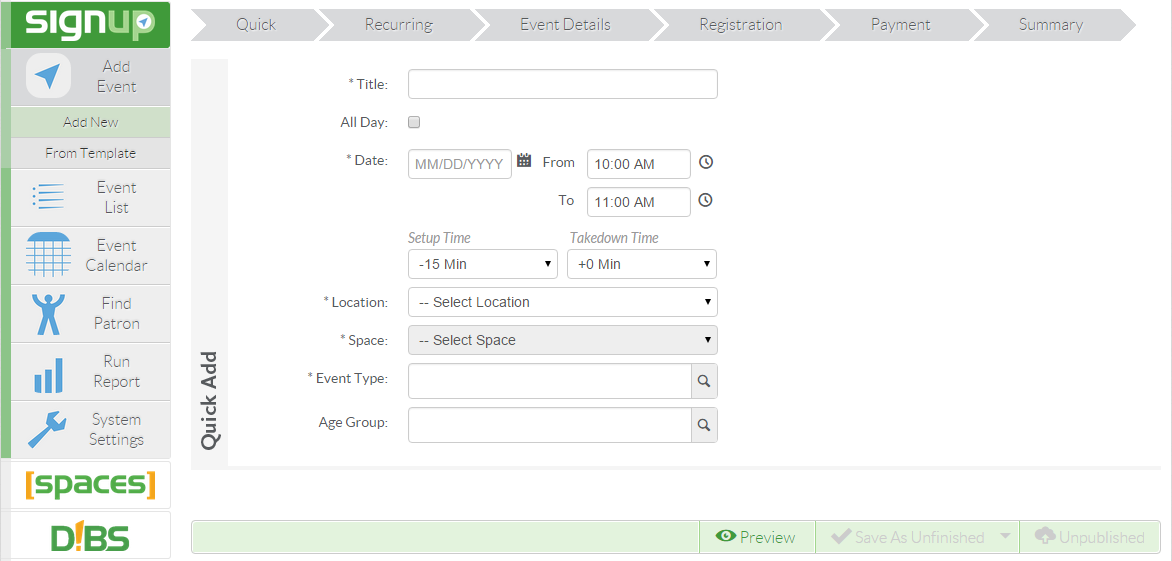
Title
Give the event a title.
Branch
This is only valid in a multibranch library. You may also select "System-wide Event".
Event Location
Where in the library will the event occur?
Date
When will the event occur?
All Day
Check if the event lasts all day, without a start and stop time other than normal branch hours.
Start Time
When does the Event begin?
End Time
When does the Event end?
Setup Time
Is any additional time required for setup? This does not appear on the public calendar, but serves to block the location.
Take Down Time
Is any additional time required for take down? This does not appear on the public calendar, but serves to block the location.
Event Type
Event types are internal classifications used to group similar kinds of events. You can choose up to three, but must choose one.
Age Group
What age group does the event apply to.
When you are finished entering the required information, you can click the arrow at the top to fill in subsequent steps. If you have correctly filled out the page, the Quick arrow will turn green and show a check mark.
There are also options available at the bottom of the page.
When you first arrive on the Quick Add page, most of these options will be greyed out until you enter information. Once you begin text entry, the options will become active, though some are not functional until you complete the page. If you attempt to save an unfinished event, the program will prompt you that your event is not finished.
Preview
Shows a preview of what the event will look like in a popup screen
Save
Saves the progress you have made without publishing the event to the public calendar.
Save & New
Saves the event and allows you to open a new Add Event page to begin a new event.
This option appears if you attempt to save an event with problems or without mandatory fields completed. It allows you to save an unpublished, incomplete version of the event that blocks no rooms.
Save as Template
This option allows you to save an event as a template for future events. When saving an event as a template, you should omit the "Date" of the event. If a "Date" is entered, the template will no longer show in the list of templates after that date unless you manually search for templates within a date range including that date.
Article ID: 418
Created On: Tue, Apr 24, 2012 at 12:05 PM
Last Updated On: Wed, Feb 28, 2018 at 11:56 AM